Build Procedure
This page describes a procedure for building Blue Prism solutions. It is not the only procedure but it is one that has been honed through many years of practice and is proven to be successful.
Building Business Objects
Designing and creating business objects is relatively easy when each object page has a specific, understandable purpose. As well as discouraging single ‘mega’ objects in favour of a series of smaller objects, Best Practice also advises to try and keep object pages simple. Complex, multipurpose pages tend to be harder to build, test, maintain and importantly, re-use.
Conceptually, the pages of a business object can be thought of as ‘mechanical parts’ that are used to create bigger machines, i.e. processes.
Although it’s normal to start building a solution by creating objects, a common beginner’s mistake is to spend too long in Object Studio before starting on the process, and this strategy is almost certain to lead to problems. The risk in concentrating on objects is that the developers forget that all the parts need to work together, and even though the individual parts may seem perfect, they don’t assemble to form a robust construction.
When this happens, there is a potentially large collection of components that don’t fit. The process has errors in many places, and it can be difficult to know what to correct. Furthermore, the project deadline is approaching, and the process does not yet work.
As mentioned above, business objects can be thought of as the mechanical side of a Blue Prism automation. They should not contain any business logic (despite the name!) and merely act as mechanisms that enable a process to manipulate applications.
The key to creating good objects is to test in Control Room as early and as often as possible. The Studio diagram can give the impression all is well because the page appears to run well but, one should never forget that diagrams run relatively slowly, and even the maximum speed is not comparable to Control Room.
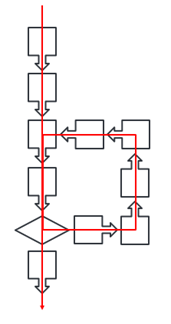
The trick is to close Object Studio regularly and create a test process to run a sequence of object pages, as shown here.
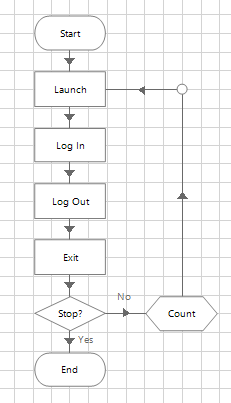
- Run the test process as a diagram first and if it fails, go back and correct the object.
- Create a loop that enables the process to repeat the steps.
- Run the published process in Control Room.
- Again, correct any problems and run again.
Once the test process is running well, the assumption can be made that these few object steps are ‘mechanically strong’. The developer can then return to creating and testing a little more object logic in the same way.
Object logic will involve a variety data – inputs, outputs, different records, screens etc. Another common pitfall when building objects is to keep using the same test data, and the risk is that the object logic will only work with this data and fail with any other. Therefore, as well as testing repeatedly, objects should be tested with as wide a variety of data as possible.
The ambition here is to prove the objects can cope with different data and to minimise the number of ‘surprise’ scenarios during the process build and test. Knowing that objects are already solid before assembling them into a process will bring confidence that the process is going to function and will also allow the developer to concentrate on the process logic without worrying about whether the application logic will work.
Building objects against an application that isn’t the same version as Production is almost certain to bring problems. A business object is unlikely to be able to use an application which it has not already been trained on; it cannot think or anticipate anything it has not already seen before, so expecting it to integrate with a different version of an app is asking too much.
Using unrealistic test data is also a potential problem. Even if the test application is the same version as Production, if the data is old and invalid, the application is likely to behave differently. The concept of using Live apps and data can be unthinkable to many new RPA clients, but like a trainee human workforce, at some point the digital workers must be allowed into the real world, albeit under supervision.
For a fuller explanation, see ‘Introducing Your Process To Live Data’ document below or under Documents.
When the ‘build and test’ strategy described earlier in the document has been used to create business objects, problems with application integration logic should be minimal – the objects have been well tested via Control Room, and any problems are likely to have been exposed before the objects were introduced into the process. Experience has shown that users who do have such problems are likely to be the ones who have not used this recommended approach to creating business objects.
Retaining the ‘test rig’ processes used to first run objects in Control Room can also be useful in isolating any future problems. Using a full-scale process to test a particular instance of object performance can be difficult and having these lightweight test processes to hand can assist the investigation effort.
That said, assets build up quickly in a busy development environment, so from a system maintenance perspective, it may be useful to remove test rigs to a file storage (as XML), rather than let the development database bulge to an extent where the performance of the BP client UI is impacted.
Process Building
Fundamentals
The number one requirement when first creating a Production process is to use a template. A template saves time, includes Best Practice and propagates a common design. Example templates can be found here and delivery teams are encouraged to create their own versions.
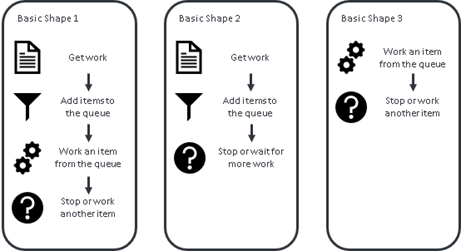
Having more than one template is not uncommon - although all processes have similarities. There are a handful of common RPA solution ‘shapes’ and having a template for each would make sense. For example, many Blue Prism processes follow one of these generic types.
Another key requirement is to use a work queue. Very occasionally there may be a valid reason for not using a queue, but this is rare. This guidance assumes the reader has completed the Foundation Training course and is already familiar with the guidance on work queues.
The Five Part Pattern
Almost any Blue Prism process intended to execute repetitive tasks can conceptually be reduced to a Five Part Pattern, as shown below.
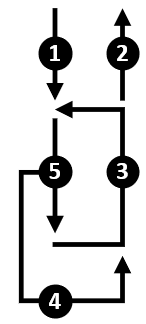
Repetition implies a loop of some kind and so we can perceive the parts of the pattern as follows:
- Part 1 defines the start of the process, before the looping has begun.
- Part 2 covers the steps after leaving the loop, when the process comes to an end.
- Part 3 is the logic required to complete the loop before starting the next task.
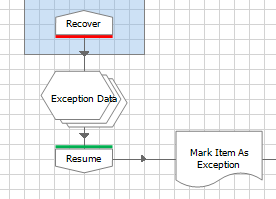
- We expect to encounter problems, so Part 4 is the recovery logic, bringing the process back to the happy path.
- Finally, Part 5 is the actual ‘work task’ logic where again, we anticipate that some tasks will result in exceptions and follow the unhappy path.
Visualising an automated process in this way can help shape the solution design, dictate the build sequence and inform the test approach. And by starting with a template, the construction of the process can be broken down into phases.
Build Phases
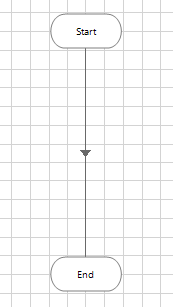
The objective of this phase is to create a skeleton process with a complete ‘end to end’ path.
- Take a copy of a template.
- Rename the main ‘work item’ pages to suit the major steps of the process. Using recognisable names will help SMEs understand the diagram.
- Add any extra ‘work item’ pages as required.
- Ensure the path from the Start and End stages of each page is complete, and if necessary simply link the Start of an empty page to the End.
This phase is to prove that the diagram flow is intact and that the process can work through queue items and apply results.
- Create a queue with Item Key named as the key field.
- Create a collection called Test Items on the Main page of the process. Add a column called Item Key and populate a few rows on the Initial Values tab with fake data.
- Join an Add to Queue action between Start and Get Next Item. This will be a temporary step that will be deleted later, so just add it anywhere on the Main page.
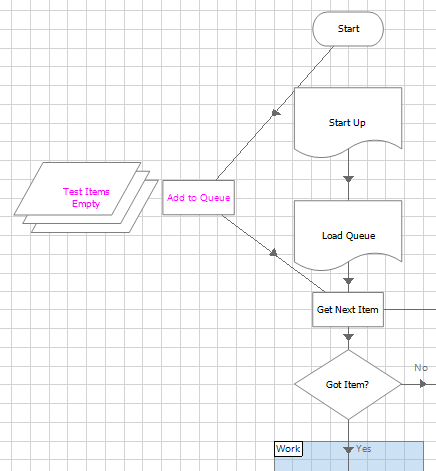
- Step through the process, checking that the data is added to the queue, Get Next Item works as expected, all the empty pages can be stepped through and Mark Completed updates the queue with results.
This activity may seem insignificant because most pages are empty. But if this step is missed, there is a real risk the process only makes it’s first ‘end to end’ run near the end of the development period, when time is running out to fix any problems.
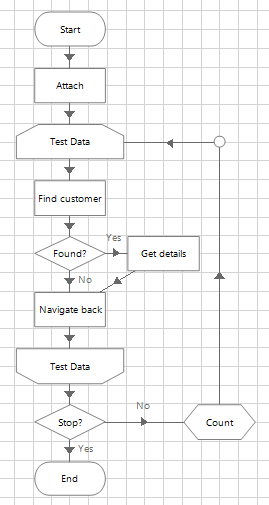
The idea with this step is to focus on the queue and to simulate how a queue item will move through the diagram.
- Add the additional columns to Test Data collection, as directed by the design document.
- Add more fake data to the Initial Values of this collection.
- Step through the process and check that Get Next Item still works and there are no spelling or datatype mistakes in the collection field names.
- Add any other data items that will be used after getting an item from the queue and check there are no spelling, value, datatype or exposure mistakes (local/global).
- Create any necessary Environment Variables and check that they work and the corresponding data items and have the right exposure.
- If the design mandates the use of tags, statuses and the like to manage queue items and control the output of Get Next Item, then rehearse these movements by stepping through the process.
- If there are any Tag Item or Update Status steps required at strategic points, then add them in. Check that the desired effect is visible in Control Room.
- If the solution defers or unlocks items, uses more than one queue, spans different days or has multiple phases, then practice and perfect the item ‘journey’ while the process is still in this ‘data only’ phase.
Again, the process is still not yet doing anything significant, other than proving that the queue data and logic is working. Perfecting this aspect of the process is very much easier to do when the process is in skeleton form, without the distraction of other business objects and application logic.
This phase is to prove that the data in the queue item collection can be validated and exception handling will update the queue correctly.
1. If it does not already exist, add a Validate Item page immediately after getting the queue item.
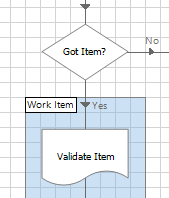
2. Add decision stages to the Validate Item page that check the collection output from Get Next Item. For example, Len([Item Data.Account Number])=8
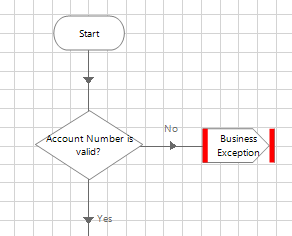
3. Throw exception stages when the validation checks are not met.
4. Change the data in the Test Data collection to include ‘bad’ data that tests every validation decision.
5. Step through the process to prove that the exceptions thrown by the validation logic are correctly handled and the queue is updated
6. Check the exception detail recorded in the queue is correct and meaningful. Remember these are the results that will be used in UAT and ultimately be sent back to the Business from the Production environment.
7. Make a list of all the validation exceptions – this will help in testing later on.
The assumption here is that the process is getting input data from a file. Evidently there are many other possible data sources and input mechanisms, and the reader may have to interpret this phase differently to suit their needs.
- Disconnect the temporary Add to Queue step and reconnect the Start stage as it was originally.
- Add the logic necessary to populate the queue.
- Prepare some dummy input data and step through the process to confirm the logic.
- Assuming the logic works, run from Control Room.
- Confirm that items are added to the queue as expected and results are applied.
- Introduce invalid data to the input file and confirm that the Validate Item page is able to detect the problems and raise exceptions accordingly. Confirm that the queue items are correctly marked as exceptions.
- Add logic to handle an invalid input file, and check that it works in Control Room.
- Add logic to avoid reading the same file twice, and check that it works in Control Room.
- Add logic to detect duplicate cases, and check that it works in Control Room.
At this point you should have a rudimentary process that technically works. The process doesn’t really do anything apart from move data around but it has a structure, a queue, exception handling and runs ‘end to end’.
When developing any process, it is strongly recommended to reach this position, where early in the build period (and for an experienced developer this can be before the end of the first day), the process can run in Control Room from start to finish. Even though the process is still useless in practical terms, the fact that it runs without breaking down is extremely valuable.
By contrast, processes that are not developed in this way risk staying in ‘diagram mode’ and never running in Control Room until late in the development period. And if the process won’t run because of spelling mistakes, syntax errors or worse, incorrect logical flow or queue data structure, then the delivery team will start to feel the pressure as they struggle to make (potentially fundamental) changes at the last moment.
Every design should describe how exception cases will be communicated back to the Business. The design may require that the process creates event-based outputs or notifications (e.g. process termination) and MI reports. If this is the case, then consider adding in the output logic while the process is in this simplified, ‘dummy data’ state.
Even if an MI mechanism already exists (e.g. another reporting process), check that it works with your new process and queue. If your process is to issue notifications or alerts, check that they are working. As always, test the new logic from Control Room and never assume Studio testing is enough.
At this point the process can load new data into the queue, simulate working through it and then output results. The basic skeleton process is now ready to be fleshed out with objects.
Only now should the application logic - the business objects - be introduced into the process skeleton.
1. Connect the Start Up page directly to the Close Down page
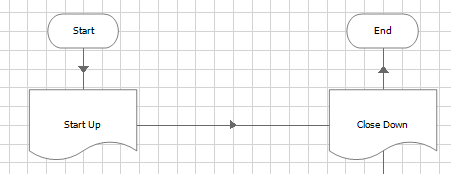
2. Create any credentials necessary to access the first target application
3. Add logic to the Start Up page to log into the application
4. Add logic to the Close Down page to exit from the application
5. Step through the process to check the logic works (which it should because the object mechanics have already been well tested)
6. Run the process in Control Room
7. Repeat the previous steps for the next target application
8. Consider the ‘unhappy path’, e.g. what could happen when a credential has expired or a password is invalid
So now at this point the process can launch and close all the applications it needs, and the process runs in Control Room without any issues.
The purpose of this phase is to prove that the process has complete control over its applications and can recover and restart them at will.
A critical aspect of process design is the ability to recover from unexpected scenarios. Enterprise RPA means ‘unattended’ automations running in a ‘lights out’ environment. This is usually achieved by having a Recover page somewhere between the end of the current case and the start of the next. The idea of the Recover page is to clean up and prepare the applications in anticipation of the next queue item.
Under normal circumstances (i.e. the happy path), this is likely to be some sort of navigation back to the ‘ready’ position or home page. But on the unhappy path, this may be more complex because the navigation could start from various exception positions and may necessitate a full restart of the applications.
To test recovery logic, force the applications into awkward positions, either by deliberately generating exceptions or by manually moving the application into a position the process is not expecting, to force a wait stage time out.
Run in Control Room to prove that the process can escape from the unhappy path. If necessary, the process should be able to close an application down, re-start it and navigate to the ‘ready’ position.
As well as the ability to recover from unexpected application behaviour, thought should begiven as to how a process will behave in the event of a ‘shock’, such as a sudden network outage or power failure.
To some extent Blue Prism will handle its queue items by applying the ‘Automatically set exception at clean up’ exception, but what happens to this item should be considered.
For example, if a financial transaction was being submitted when the outage struck, would it be better to rework the case (and risk transacting twice) or send the case for manual referral (and risk missing the transaction). Not every process requires such careful design but depending on the business context, it may be necessary to think carefully about such possibilities, however unlikely.
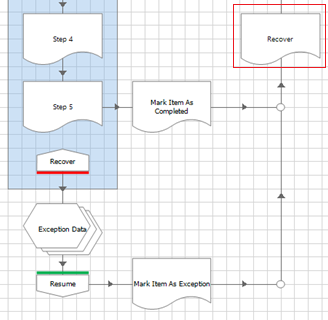
Only here, at the tenth phase of development, do we introduce the first step of the actual ‘work case’ part of the process.
1. Connect the first ‘work’ page reference directly to the Mark Completed step. If necessary, use an inert stage like a Note or Anchor to create the link.
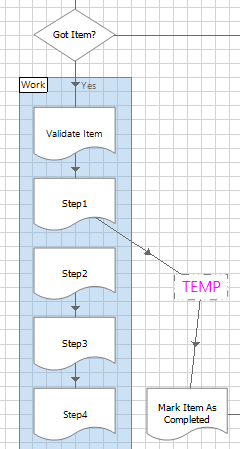
2. Add logic to the sub-page and step through to check that it works (which it should, again because the objects have already been well tested).
3. Run the process in Control Room. More than once. With a variety of data. Good data and bad data.
If there are any issues, then they are very likely to be on this newest page – you should not need to look very far for the source of the problem.
This phase continues the idea of gradually adding more detail to the ‘work’ section of the Main page and regularly using Control Room to prove that the process still works.
1. Reconnect the first ‘work’ page to the second page
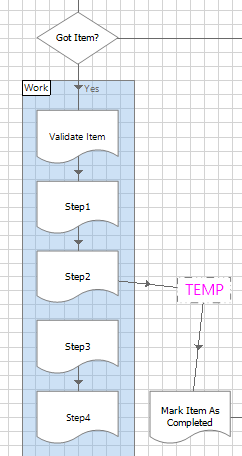
2. Connect the second page directly to the Mark Completed step
3. Add logic to the second page and step through to check that it works
4. Run the process in Control Room. Multiple times. With different data.
As before, if there are problems then they are very likely to be on this latest page.
A consequence of developing incrementally like this is that it takes longer and longer to arrive at the later pages of the process. And this brings the possibility that the later pages are not as well tested as the earlier pages.
As the sequence lengthens, the time taken to reach these steps increases and possibly this will slow the development progress. Therefore, where possible, ‘short circuit’ the logic and jump directly to these later pages. Note that this isn’t always logically possible, depending on the business process.
As ever, run the process in Control Room. Multiple times. With different data. And remember, if there are problems then they are very likely to be on this latest page.
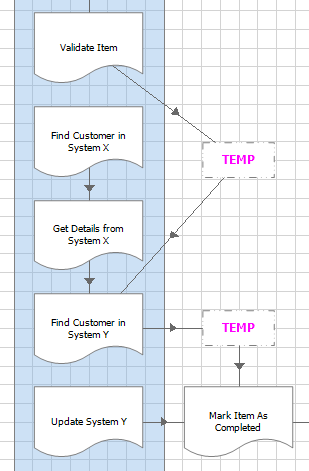
Evidently the example above is simplified for the sake of clarity, and in the real world processes can be more complex. But even so, the same principle applies – build and test incrementally in order to ‘fail fast’ and fix problems early rather than find them when time is running out.
We are all aware that an RPA solution is a predefined logical sequence. There is no brain, no judgment, no adapting, no learning. Maybe in the future AI and ML could change this but for now, that topic is not within the scope of this document.
Knowing this, the project’s functional requirements and solution design should define the automation scope - what the process will do and, importantly, what it will not do. Adopting a ‘scenario mindset’ throughout the delivery phase and visualising a solution as a set of scenarios rather than as an automated replica of the manual process, helps focus minds on what the scope will and will not cover.
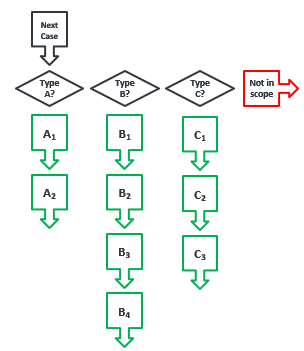
This in turn adds precision to the build specification and defines the testing and acceptance criteria. With this in mind, the developer should try to concentrate on one scenario at a time. Where possible, input data should be rigged so that only one type of case is loaded and worked. Or maybe the process diagram can be temporarily changed to focus on a particular scenario.
Throughout delivery, there should be a record of which scenarios have been developed, worked, tested and accepted. Unfortunately, this is often overlooked and processes go to Production too soon, resulting in a prolonged and painful go-live where the automation is beset by ‘surprise’ problems.
To repeat, RPA automation logic can only be predefined.
Process Debugging
The key to debugging a process is the ability to locate the source of the problem.
As any Blue Prism developer should know, the work queue provides a high-level view and the session log provides a low-level view of exceptions. With this in mind, effort should be made to ensure the information recorded in the queue and logs is useful. In particular, exception types should be carefully chosen, and exception details should be accurate.
We all know Copy and Paste is a great time-saver during development, but care must be taken to avoid duplicating exception information. A ‘narrative’ of a queue item’s progress through a process can also be recorded to assist investigation into problems. The Status, Tags and Item Data collection can all be updated with trace information.
Recall however that Best Practice mandates that Tags must not be used to carry case-specific data (such as a Client ID or address) and should only be used for the categorisation of queue items. Excessive numbers of unique Tags have been known to put undue strain on the database.
Similarly, the logging level in a diagram can and should be adjusted. Note stages can be useful for recording a ‘marker’ in a session log. Screenshots, both as temporary aides or as part of exception handling, can also be helpful when it’s difficult to witness a problem.
When problems do arise, it can be useful to have the ability to identify, isolate and replicate the type of input/data/case/scenario/time/whatever that is causing the issue. And with practice, a developer can learn to prepare a process diagram in such a way as to make this easier.
Summary
- Avoid designing single large objects with many pages
- Use a series of mini objects instead of one mega object
- Keep the purpose of each object page simple and functional.
- Develop and test objects at the same time
- Stop every few pages and run a test process
- Run tests via Control Room, not just in Studio.
- Think about the data used to test objects
- Prove consistency by repeating tests with the same data
- Prove reliability by testing with different data
- Prove resilience by testing with bad data as well as good.
- Strong objects minimise the chance of ‘mechanical’ errors complicating the process build phase.
- Use a process template
- Use a queue
- Start by making a ‘data only’ skeleton that is able to run
- Add fake data to the queue to begin with
- Create validation logic to mark bad work items as exceptions
- Create the logic to produce output
- Enable to process to control (launch, close and restart) the applications
- Develop one ‘work case’ page of the process at a time
- Perceive the process as a set of scenarios, both positive and negative
- Keep track of which scenarios have been built and tested. Pay attention to any that have not been seen.